Neon's logical replication feature allows you to replicate data from your Neon Postgres database to external destinations. In this guide, you will learn how to define your Neon Postgres database as a data source in Airbyte so that you can stream data to Databricks Lakehouse.
Airbyte is an open-source data integration platform that moves data from a source to a destination system. Airbyte offers a large library of connectors for various data sources and destinations.
Databricks is a unified, open analytics platform that combines the best of data lakes and data warehouses into a "lakehouse" architecture. Databricks allows organizations to build, deploy, and manage data, analytics, and AI solutions at scale.
Prerequisites
-
A source Neon project with a database containing the data you want to replicate. If you're just testing this out and need some data to play with, you run the following statements from the Neon SQL Editor or an SQL client such as psql to create a table with sample data:
CREATE TABLE IF NOT EXISTS playing_with_neon(id SERIAL PRIMARY KEY, name TEXT NOT NULL, value REAL); INSERT INTO playing_with_neon(name, value) SELECT LEFT(md5(i::TEXT), 10), random() FROM generate_series(1, 10) s(i); -
An Airbyte cloud account or a self-hosted Airbyte instance
-
A Databricks account with an active workspace.
-
Read the important notices about logical replication in Neon before you begin.
Prepare your source Neon database
This section describes how to prepare your source Neon database (the publisher) for replicating data.
Enable logical replication in Neon
important
Enabling logical replication modifies the Postgres wal_level configuration parameter, changing it from replica to logical for all databases in your Neon project. Once the wal_level setting is changed to logical, it cannot be reverted. Enabling logical replication also restarts all computes in your Neon project, meaning active connections will be dropped and have to reconnect.
To enable logical replication in Neon:
- Select your project in the Neon Console.
- On the Neon Dashboard, select Settings.
- Select Logical Replication.
- Click Enable to enable logical replication.
You can verify that logical replication is enabled by running the following query from the Neon SQL Editor or an SQL client such as psql:
SHOW wal_level;
 wal_level
-----------
 logical
Create a Postgres role for replication
It's recommended that you create a dedicated Postgres role for replicating data. The role must have the REPLICATION privilege. The default Postgres role created with your Neon project and roles created using the Neon CLI, Console, or API are granted membership in the neon_superuser role, which has the required REPLICATION privilege.
The following CLI command creates a role. To view the CLI documentation for this command, see Neon CLI commands — roles
neon roles create --name replication_userGrant schema access to your Postgres role
If your replication role does not own the schemas and tables you are replicating from, make sure to grant access. For example, the following commands grant access to all tables in the public schema to Postgres role replication_user:
GRANT USAGE ON SCHEMA public TO replication_user;
GRANT SELECT ON ALL TABLES IN SCHEMA public TO replication_user;
ALTER DEFAULT PRIVILEGES IN SCHEMA public GRANT SELECT ON TABLES TO replication_user;
Granting SELECT ON ALL TABLES IN SCHEMA instead of naming the specific tables avoids having to add privileges later if you add tables to your publication.
Create a replication slot
Airbyte requires a dedicated replication slot. Only one source should be configured to use this replication slot.
Airbyte uses the pgoutput plugin in Postgres for decoding WAL changes into a logical replication stream. To create a replication slot called airbyte_slot that uses the pgoutput plugin, run the following command on your database using your replication role:
SELECT pg_create_logical_replication_slot('airbyte_slot', 'pgoutput');airbyte_slot is the name assigned to the replication slot. You will need to provide this name when you set up your Airbyte source.
Create a publication
Perform the following steps for each table you want to replicate data from:
-
Add the replication identity (the method of distinguishing between rows) for each table you want to replicate:
ALTER TABLE <table_name> REPLICA IDENTITY DEFAULT;In rare cases, if your tables use data types that support TOAST or have very large field values, consider using
REPLICA IDENTITY FULLinstead:ALTER TABLE <table_name> REPLICA IDENTITY FULL; -
Create the Postgres publication. Include all tables you want to replicate as part of the publication:
CREATE PUBLICATION airbyte_publication FOR TABLE <tbl1, tbl2, tbl3>;The publication name is customizable. Refer to the Postgres docs if you need to add or remove tables from your publication.
note
The Airbyte UI currently allows selecting any table for Change Data Capture (CDC). If a table is selected that is not part of the publication, it will not be replicated even though it is selected. If a table is part of the publication but does not have a replication identity, the replication identity will be created automatically on the first run if the Postgres role you use with Airbyte has the necessary permissions.
Create a Postgres source in Airbyte
-
From your Airbyte Cloud account, or your self-hosted Airbyte instance, select Sources from the left navigation bar, search for Postgres, and then create a new Postgres source.
-
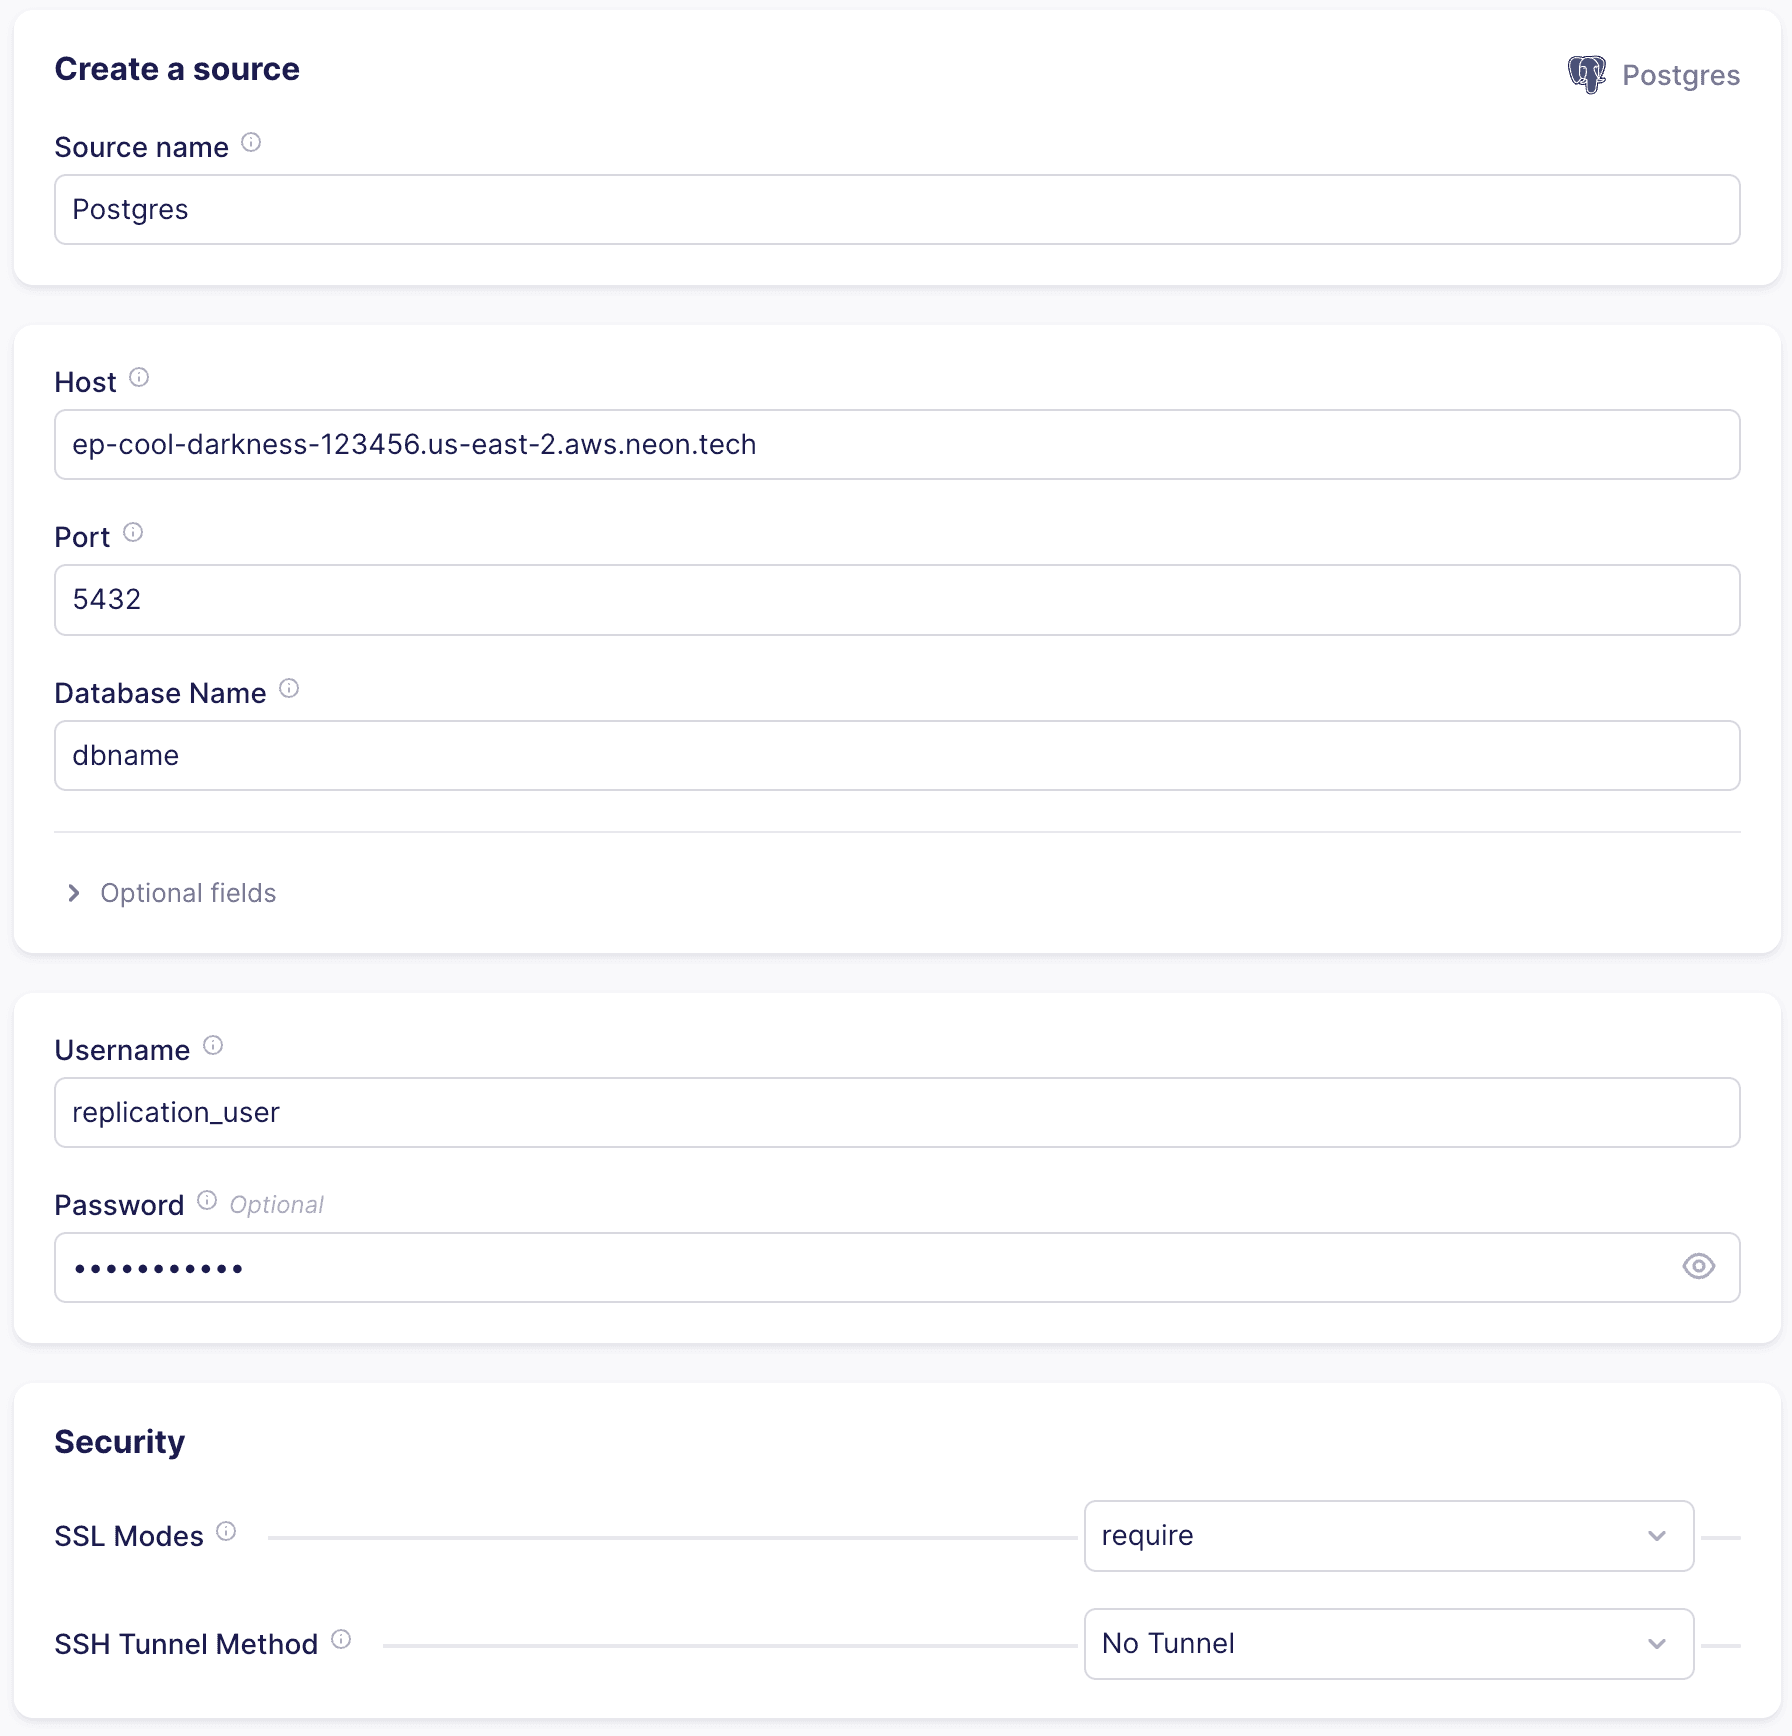
Enter the connection details for your Neon database. You can find your database connection details by clicking the Connect button on your Project Dashboard.
Make sure to select the
replication_userrole you created earlier when connecting to your Neon database. This role must have theREPLICATIONprivilege and access to the schemas and tables you want to replicate.For example, given a connection string like this:
postgresql://alex:AbC123dEf@ep-cool-darkness-123456.us-east-2.aws.neon.tech/dbname?sslmode=requireEnter the details in the Airbyte Create a source dialog as shown below. Your values will differ.
- Host: ep-cool-darkness-123456.us-east-2.aws.neon.tech
- Port: 5432
- Database Name: dbname
- Username: replication_user
- Password: AbC123dEf
-
Under Optional fields, list the schemas you want to sync. Schema names are case-sensitive, and multiple schemas may be specified. By default,
publicis the only selected schema. -
Select an SSL mode. You will most frequently choose
requireorverify-ca. Both of these options always require encryption. Theverify-camode requires a certificate. Refer to Connect securely for information about the location of certificate files you can use with Neon. -
Under Advanced:
- Select Read Changes using Write-Ahead Log (CDC) from available replication methods.
- In the Replication Slot field, enter the name of the replication slot you created previously:
airbyte_slot. - In the Publication field, enter the name of the publication you created previously:
airbyte_publication.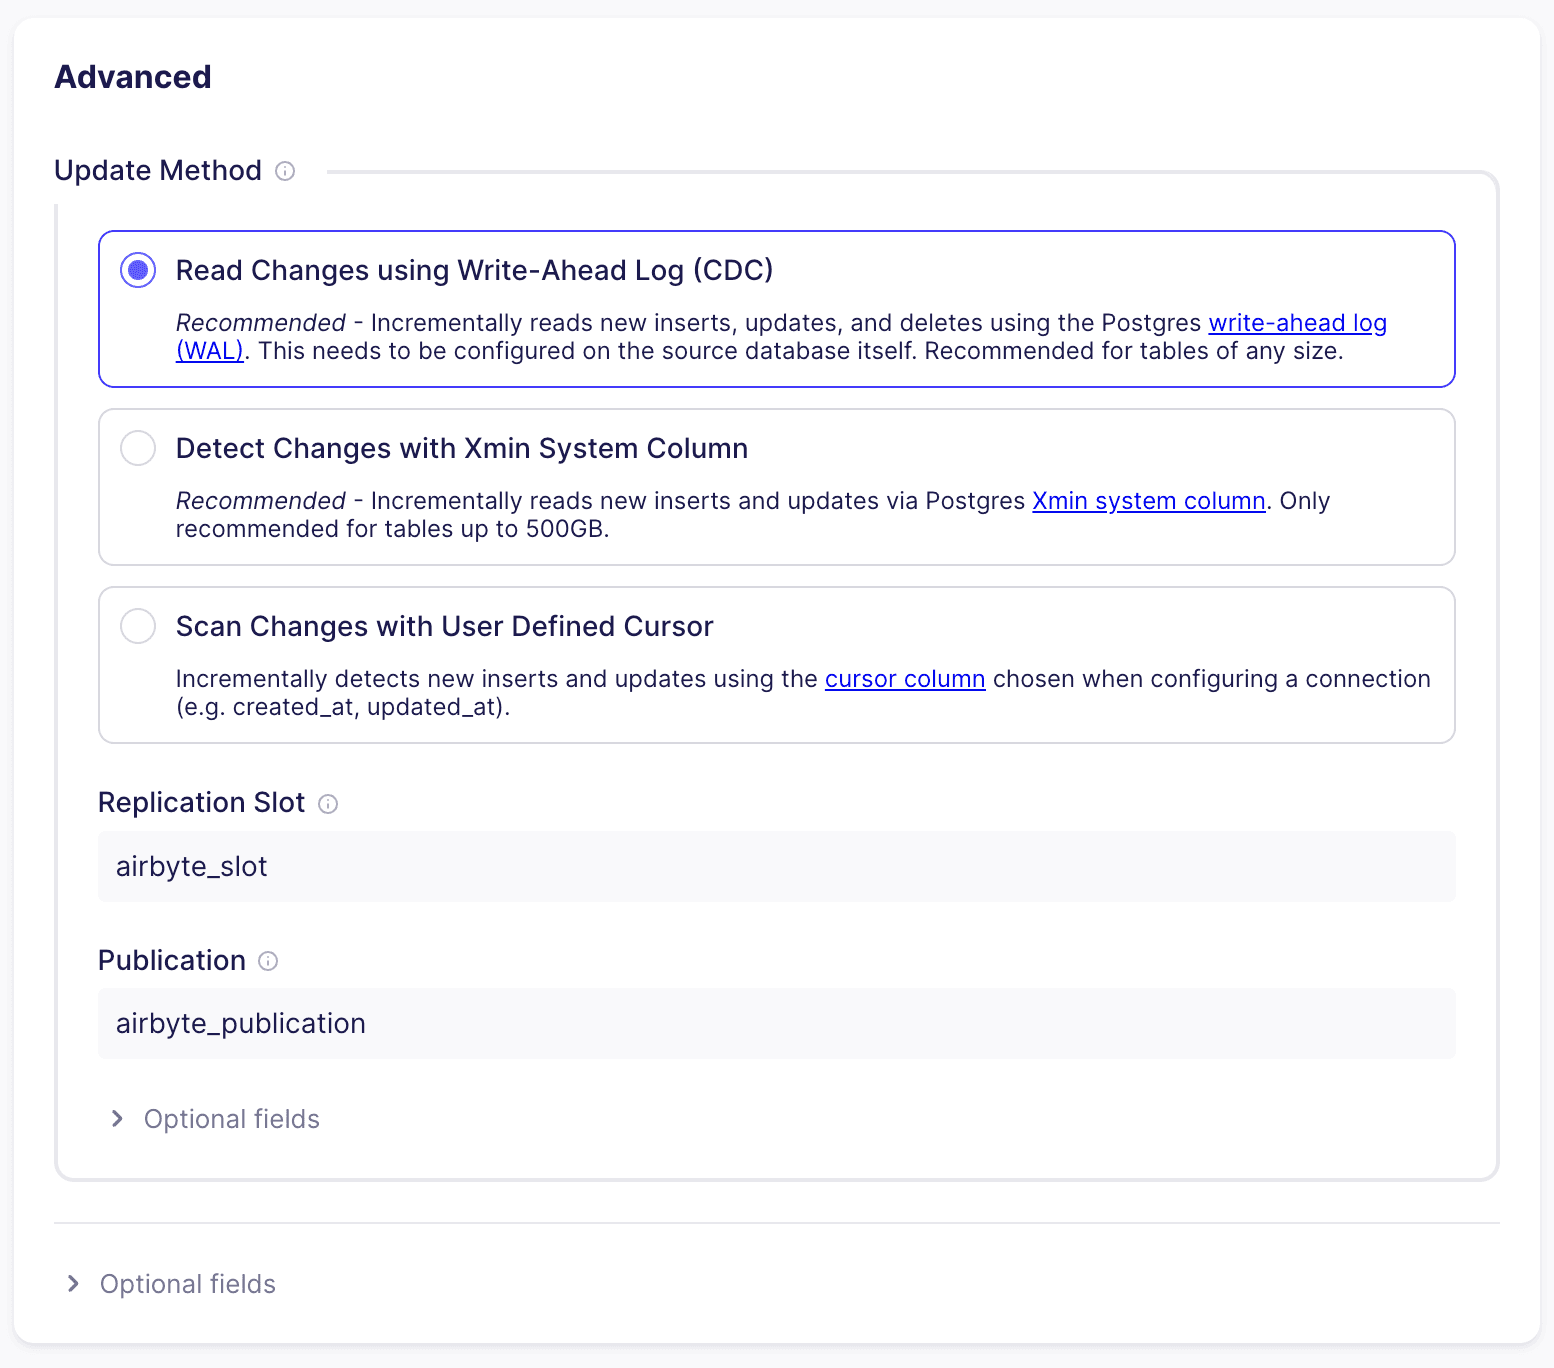
Allow inbound traffic
If you are on Airbyte Cloud, and you are using Neon's IP Allow feature to limit IP addresses that can connect to Neon, you will need to allow inbound traffic from Airbyte's IP addresses. You can find a list of IPs that need to be allowlisted in the Airbyte Security docs. For self-hosted Airbyte, you will need to allow inbound traffic from the IP address of your Airbyte instance. For information about configuring allowed IPs in Neon, see Configure IP Allow.
Complete the source setup
To complete your source setup, click Set up source in the Airbyte UI. Airbyte will test the connection to your database. Once this succeeds, you've successfully configured an Airbyte Postgres source for your Neon database.
Configure Databricks Lakehouse as a destination
To complete your data integration setup, you can now add Databricks Lakehouse as your destination.
Prerequisites
- Databricks Server Hostname: The hostname of your Databricks SQL Warehouse or All-Purpose Cluster (e.g.,
adb-xxxxxxxxxxxxxxx.x.azuredatabricks.netordbc-xxxxxxxx-xxxx.cloud.databricks.com). You can find this in the Connection Details of your SQL Warehouse or Cluster. - Databricks HTTP Path: The HTTP Path for your SQL Warehouse or Cluster. Found in the Connection Details.
- Databricks Personal Access Token (PAT): A token used to authenticate. You can generate it from the same connection details page in Databricks.
- Databricks Unity Catalog Name: The name of the Unity Catalog you wish to use.
- (Optional) Default Schema: The schema within the Unity Catalog where tables will be created if not otherwise specified.
important
Ensure the Databricks SQL Warehouse or Cluster is running and accessible. The PAT must have sufficient permissions within the specified Unity Catalog and for the operations Airbyte will perform (e.g., CREATE TABLE, CREATE SCHEMA if the Default Schema doesn't exist, INSERT data).
Set up Databricks Lakehouse as a destination
-
Navigate to Airbyte.
-
Select Destinations from the left navigation bar, search for Databricks Lakehouse, and then select it.
-
Click + New destination and choose Databricks Lakehouse.
-
Configure the Databricks Lakehouse destination:
Field Description Example (Illustrative) Destination name A descriptive name for your destination in Airbyte. Databricks LakehouseServer Hostname The Server Hostname of your Databricks SQL Warehouse or cluster. dbc-a1b2345c-d6e7.cloud.databricks.comHTTP Path The HTTP Path from your Databricks SQL Warehouse or cluster's connection details. /sql/1.0/warehouses/1234567890abcdefDatabricks Unity Catalog Name (Required) The name of the Unity Catalog where data will be written. workspaceAuthentication Choose Personal Access Token. Personal Access TokenPersonal Access Token Enter your Databricks PAT. dapi1234567890abcdef1234567890abcdPort (Optional Fields) The port for the Databricks connection. 443(Default)Default Schema (Optional Fields) The default schema within the Unity Catalog to write to. Airbyte will create this schema if it doesn't exist. airbyte_neon_dataPurge Staging Files and Tables (Optional Fields) Enable to automatically clean up temporary staging files and tables used during the replication process. Usually recommended. Enabled(Default)Raw Table Schema Name (Optional Fields) Schema used for storing raw data tables (airbyte_raw*). airbyte_internal(Default)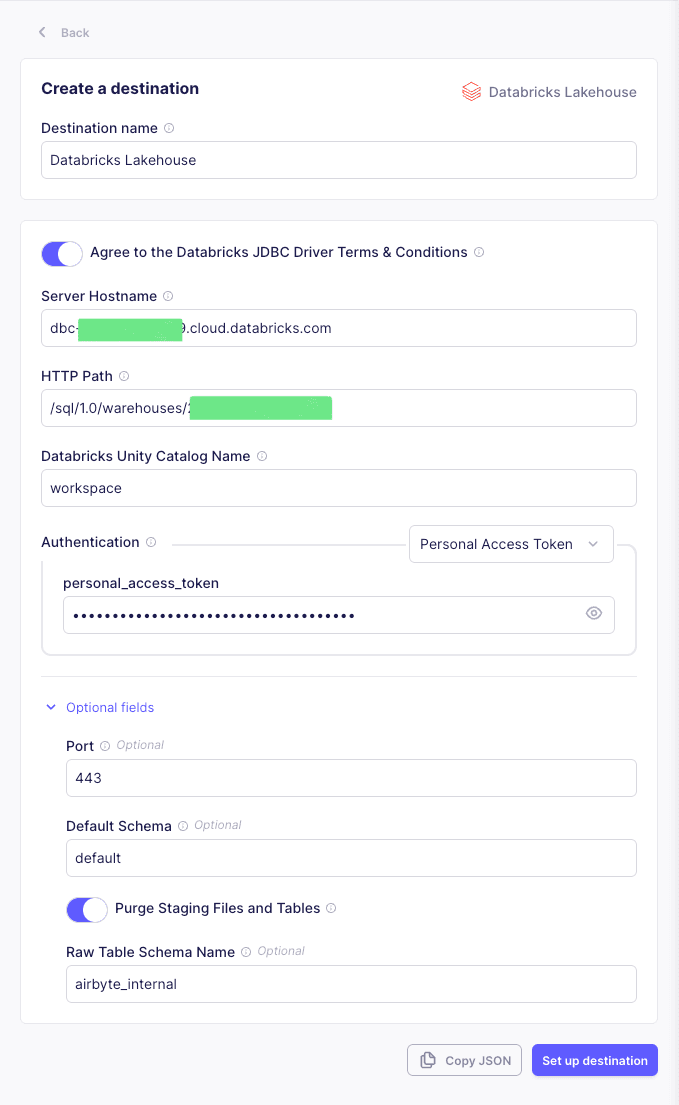
-
When you're finished filling in the fields, click Set up destination. Airbyte will test the connection to your Databricks Lakehouse environment.
Set up a connection
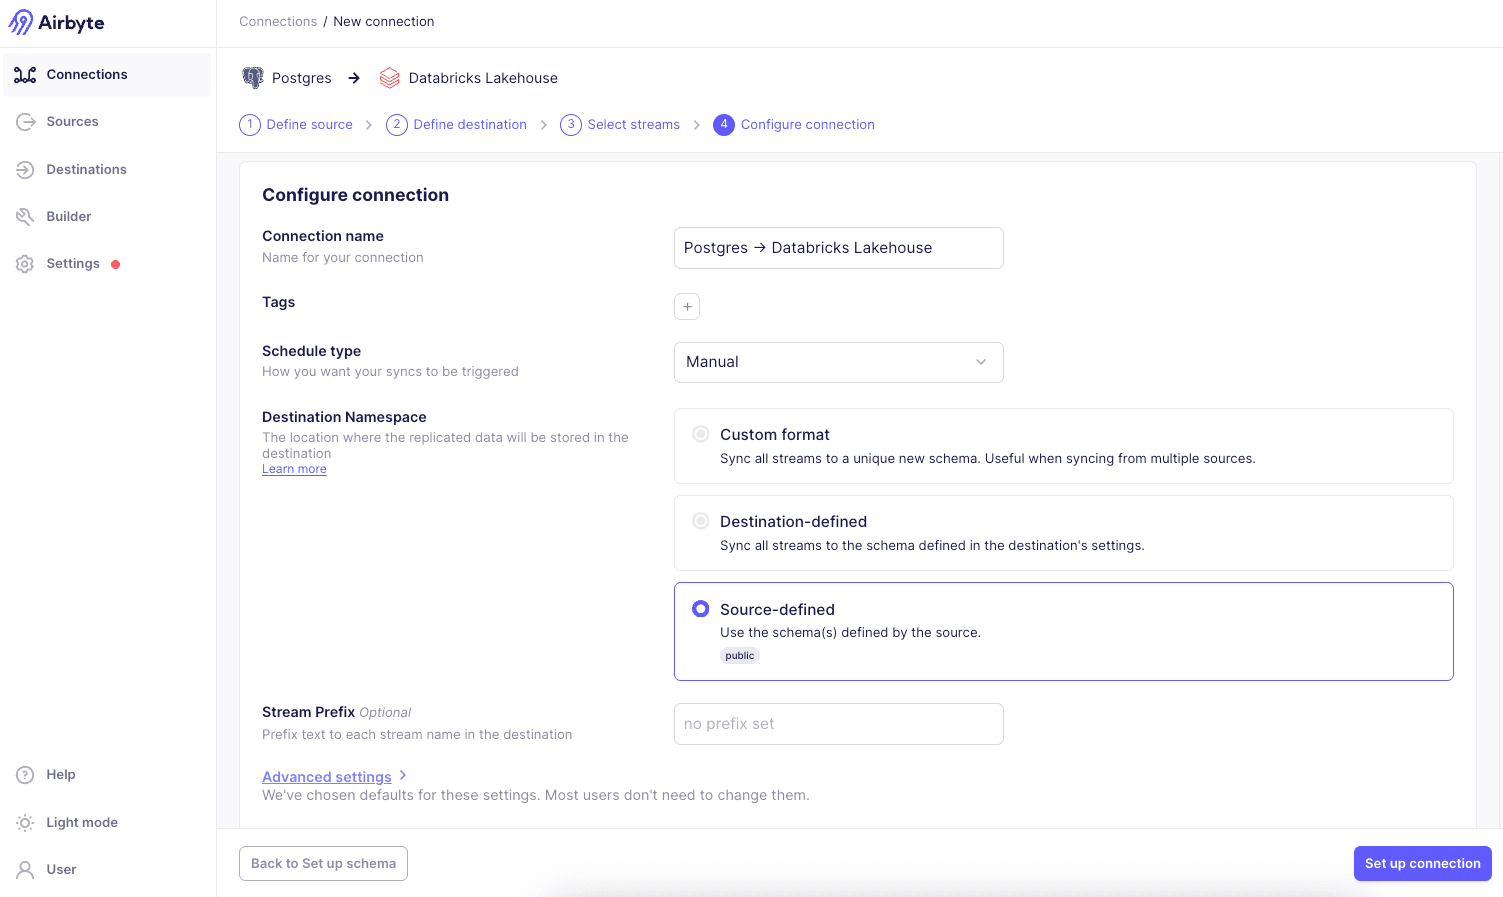
In this step, you'll set up a connection between your Neon Postgres source and your Databricks Lakehouse destination.
To set up a new connection:
- Navigate to Airbyte.
- Select Connections from the left navigation bar, then click + New connection.
- Select the existing Postgres source you created earlier.
- Select the existing Databricks Lakehouse destination you created earlier.
- For the Sync Mode, select Replicate Source. Then, choose the specific tables from your Neon Postgres source that you want to replicate. Ensure you only select tables that are part of the PostgreSQL publication you created earlier (e.g.,
playing_with_neon). - Click Next.

- Configure the sync frequency and other settings as needed. Select Source defined for the Destination Namespace.
Your first sync will start automatically soon, or you can initiate it manually if you opted for a manual schedule. Airbyte will then replicate data from Neon Postgres to your Databricks Lakehouse. The time this initial sync takes will depend on the amount of data.
Verify the replication
After the sync operation is complete, you can verify the replication by navigating to your Databricks workspace.
-
Go to your Databricks workspace.
-
Navigate to SQL Editor from the left sidebar.
-
Run the following SQL query to check the replicated data:
SELECT * FROM workspace.public.playing_with_neon;In the query, substitute
workspacewith the Databricks Unity Catalog Name you configured in Airbyte. The schemapublicshould be replaced with the Default Schema you specified in the destination settings. Similarly, replaceplaying_with_neonwith the name of the table you replicated.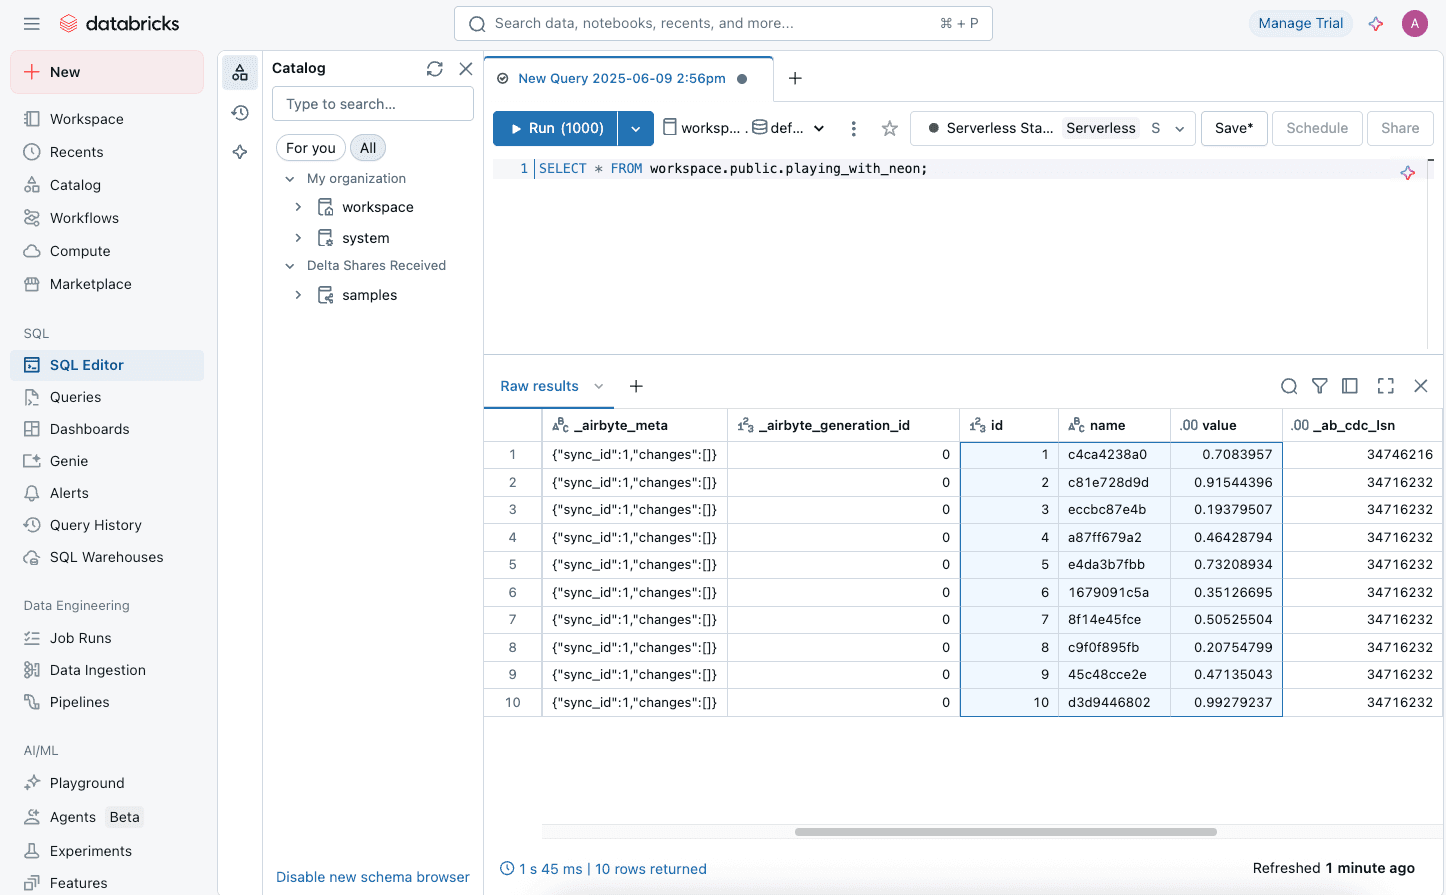
This will display the data replicated from your Neon Postgres into your Databricks Lakehouse.
References
- Airbyte Documentation
- Airbyte Databricks Lakehouse Destination Connector
- Databricks Documentation
- Databricks Unity Catalog documentation
- Neon Logical Replication
- Logical replication - PostgreSQL documentation
- Publications - PostgreSQL documentation
Need help?
Join our Discord Server to ask questions or see what others are doing with Neon. Users on paid plans can open a support ticket from the console. For more details, see Getting Support.